This guide demonstrates how to integrate Auth0 with any new or existing Go API application using go-jwt-middleware.Each Auth0 API uses the API Identifier, which your application needs to validate the access token.
New to Auth0? Learn how Auth0 works and read about implementing API authentication and authorization using the OAuth 2.0 framework.
1
Before we begin, make sure you have the following:
Go 1.24+
Required for v3 of go-jwt-middleware (which uses generics). Check your version with
go versionAuth0 Account
Sign up for free at auth0.com/signup
Code Editor
VS Code, GoLand, or your preferred editor
Terminal Access
Command line for running Go commands
2
Create an API in your Auth0 Dashboard to get started.
1
Navigate to APIs
Go to the APIs section in the Auth0 dashboard and click Create API.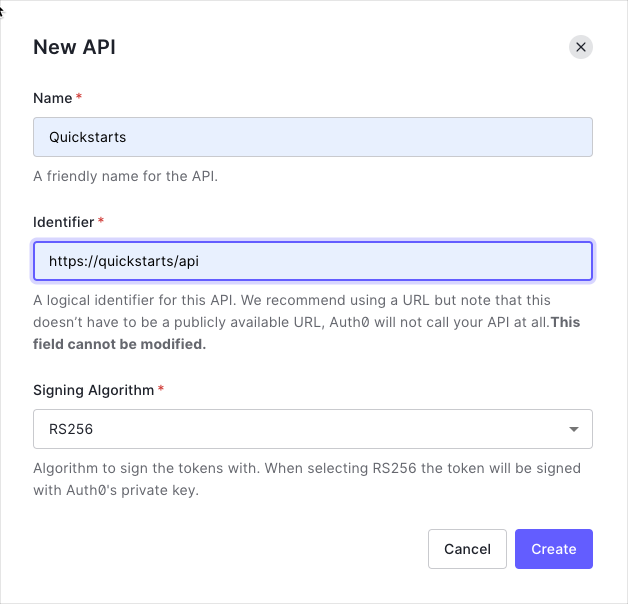
2
Configure API settings
- Name:
Quickstarts(or any descriptive name) - Identifier:
https://quickstarts/api(this becomes youraudience) - Signing Algorithm: Leave as RS256 (recommended)
3
Understand RS256
Your API uses RS256 (asymmetric algorithm):
- Auth0 signs tokens with a private key
- Your API verifies tokens with a public key (from JWKS)
- Public keys are fetched from:
https://{yourDomain}/.well-known/jwks.json
3
Permissions let you define how resources can be accessed on behalf of the user with a given access token.In your API settings, click the Permissions tab and create the following permission:
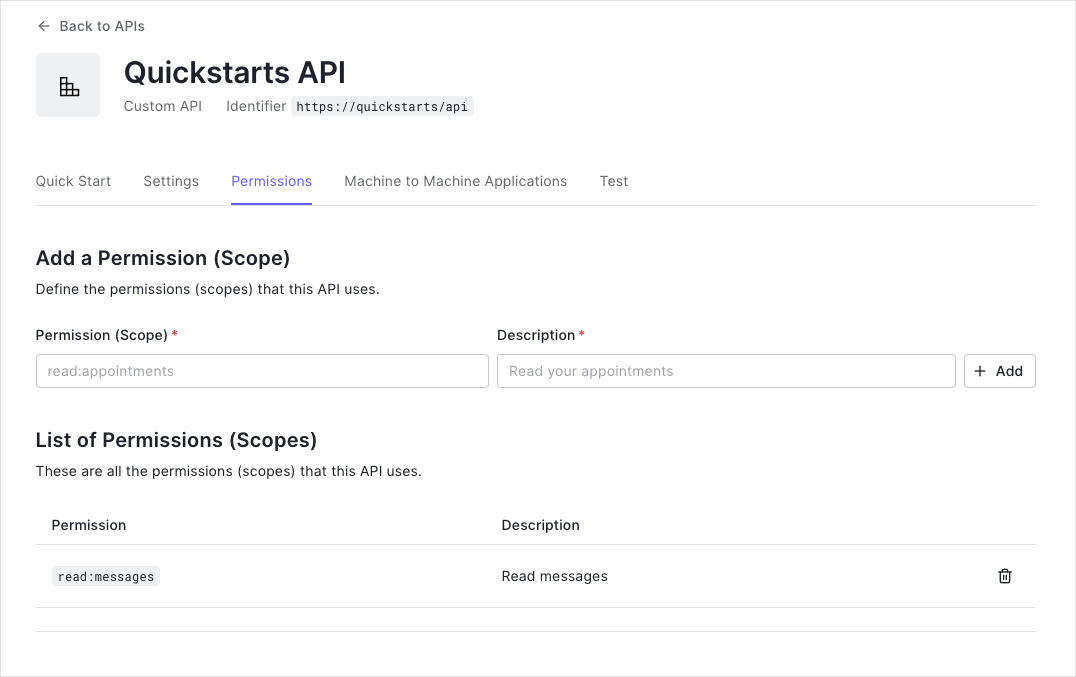
| Permission | Description |
|---|---|
read:messages | Read messages from the API |
This tutorial uses the
read:messages scope to protect the scoped endpoint.4
Set up your Go project structure and install the required dependencies.
1
Create project directory
2
Initialize Go module
3
Install dependencies
4
Download all dependencies
View complete go.mod file
View complete go.mod file
5
Create a Create a config package to load and validate these environment variables in
.env file in your project root to store Auth0 configuration:internal/config/auth.go (see the code in the right sidebar).Why use a config package?
Why use a config package?
Benefits of centralized configuration:
- Single source of truth for environment variables
- Clear error messages for missing configuration
- Type-safe configuration access
- Easy to test and mock
Security best practices
Security best practices
- Never commit
.envfiles to version control - Add
.envto your.gitignorefile - Use different
.envfiles for different environments - Validate all required config on startup (fail fast)
6
Create custom claims to extract and validate application-specific data from JWTs in
internal/auth/claims.go (see the code in the right sidebar).Why custom claims?
Why custom claims?
Custom claims allow you to:
- Extract permissions (scopes) from JWT tokens
- Validate claim formatting automatically
- Add domain-specific authorization logic
- Keep business logic separate from validation
Validate method is called automatically by the middleware after parsing the JWT.Validation behavior
Validation behavior
The
Validate method ensures:- Scope is optional - allows tokens without scopes (for
/api/privateendpoint) - Format validation - when scope exists, checks for proper formatting
- No whitespace issues - prevents malformed scope strings
- Called automatically - runs before your handlers execute
HasScope method
HasScope method
The
HasScope helper method:- Parses space-separated scopes (e.g.,
"read:messages write:messages") - Returns
falseif scope is empty (prevents false positives) - Used in handlers to enforce permission-based access
7
Create the JWT validator in
internal/auth/validator.go (see the code in the right sidebar).What does the validator do?
What does the validator do?
The validator performs these security checks on every JWT:
- Signature verification using Auth0’s public keys (JWKS)
- Issuer validation -
issclaim matches your Auth0 domain - Audience validation -
audclaim matches your API identifier - Expiration check - token hasn’t expired (
expclaim) - Time validity - token is currently valid (
nbfandiatclaims)
Key features explained
Key features explained
Options Pattern: Uses functional options like
validator.WithAllowedClockSkew() for flexible configurationJWKS Caching: Automatically fetches and caches Auth0’s public keys every 5 minutes, reducing network callsAlgorithm Specification: Explicitly sets RS256 to prevent algorithm confusion attacksClock Skew Tolerance: Allows 30 seconds for distributed system clock differencesWhy separate validator from middleware?
Why separate validator from middleware?
The core-adapter architecture separates JWT validation logic (core) from HTTP concerns (adapter). This means:
- You can reuse the same validator across different frameworks
- Easier to test validation logic in isolation
- Can use with HTTP, gRPC, or any other transport
8
Create the HTTP middleware that wraps your validator in
internal/auth/middleware.go (see the code in the right sidebar).Built-in structured logging using Go’s standard log/slog package. The middleware will log token validation events for debugging.The middleware:- Extracts JWT from
Authorization: Bearer <token>header - Validates token using the core validator
- Skips validation for OPTIONS requests (CORS preflight)
- Injects validated claims into request context
- Returns RFC 6750 compliant error responses on failure
9
Create API handlers with different protection levels in
internal/handlers/api.go and the main server in cmd/server/main.go (see the code in the right sidebar).Generic Claims Feature:GetClaims[*validator.ValidatedClaims]uses generics for compile-time type safety- No runtime type assertions that can panic
- IDE autocomplete for claim fields
- Custom claims implement
Validate(ctx context.Context) errorfor domain-specific validation
- Public (
/api/public): No authentication required - Private (
/api/private): Valid JWT required - Scoped (
/api/private-scoped): Valid JWT + specific scope (read:messages) required
- Graceful shutdown handling
- Configurable timeouts (read, write, idle)
- Proper error handling
- Environment variable configuration
10
Now let’s test your implementation to make sure everything works correctly.You should see: 
1
Start your server
Server starting on :8080The server automatically loads environment variables from your
.env file using godotenv.2
Get a test token
- From Auth0 Dashboard
- Via Client Credentials
- Go to your API in the Auth0 Dashboard
- Click the Test tab
- Click Copy Token to get a valid JWT
3
Test public endpoint
This endpoint should work without authentication:
Expected: 200 OK with message “Hello from a public endpoint!”
4
Test private endpoint (without token)
This should fail with a 401 error:
Expected: 401 Unauthorized
{"error": "invalid_token"}5
Test private endpoint (with token)
This should succeed with a valid token:
Expected: 200 OK with user information
6
Test scoped endpoint
This requires the
read:messages scope:Expected: 200 OK if token has
read:messages scope, 403 Forbidden otherwiseCheckpoint Complete! If all tests passed, your Auth0 integration is working correctly. Your API now:
- Validates JWTs from Auth0
- Protects private endpoints
- Enforces permission-based access
Continue the Tutorial
Using Your API
Learn how to call your protected Go API from client applications with examples in cURL, Go, Java, Node.js, Python, Ruby, and Swift.
Troubleshooting Guide
Comprehensive debugging guide covering common issues like invalid issuer, audience errors, JWKS problems, and more.
Quick Troubleshooting
Invalid Audience Error
Invalid Audience Error
Error Message:Solution: Verify
AUTH0_AUDIENCE exactly matches your API Identifier from the Auth0 Dashboard.JWKS Endpoint Unreachable
JWKS Endpoint Unreachable
Error Message:Solutions:
- Check network connectivity to Auth0 (firewall/proxy settings)
- Test JWKS endpoint manually:
- Verify correct Auth0 region (us/eu/au)
Wrong Import Path
Wrong Import Path
Error Message:Solution: Ensure all imports use the
/v3 suffix:Token Expired Error
Token Expired Error
Error Message:Solutions:
- Get a new token from the Auth0 Dashboard Test tab
- Check if your server clock is synchronized
- Adjust clock skew tolerance:
Advanced: DPoP Support
Advanced: DPoP Support
DPoP (Demonstrating Proof-of-Possession) per RFC 9449 provides enhanced security by preventing token theft through cryptographic key binding.When to use DPoP:DPoP Modes:
- Financial APIs handling sensitive transactions
- Healthcare APIs with patient data
- High-security enterprise applications
DPoPAllowed(default): Accept both Bearer and DPoP tokensDPoPRequired: Only accept DPoP tokens, reject BearerDPoPDisabled: Only accept Bearer tokens, reject DPoP
Best Practices
Security:- Always use HTTPS in production
- Validate algorithms explicitly (prevents algorithm confusion attacks)
- Use short-lived access tokens (15-30 minutes) with refresh tokens
- Enable DPoP for sensitive APIs
- Never log tokens in plaintext
- Reuse validator instances (create once at startup)
- Configure JWKS cache appropriately (5-15 minute TTL)
- Set reasonable HTTP timeouts
- Use connection pooling (enabled by default in Go)
- Use environment variables for credentials
- Define type-safe custom claims structs
- Enable structured logging with
slog - Test with mock validators
- Document custom claims with JSON tags
Project Structure
Recommended structure for production Go APIs:Next Steps
Now that you have a working Go API with Auth0 authentication, explore advanced features:Custom Claims Validation
Add domain-specific authorization logic with type-safe claims
Token Refresh
Implement refresh token flow for long-lived sessions
DPoP Security
Enable proof-of-possession for enhanced security
Organizations
Enable multi-tenant authorization for B2B apps
Production Checklist
Pre-launch security review and best practices
API Documentation
Complete SDK reference and advanced examples